Did you know young children can sew – Montessori sewing activity
Today I wanted to highlight an activity that is a little secret in our classroom – the Montessori sewing activity. And I realised it’s because many parents don’t know how to guide their child with this activity.
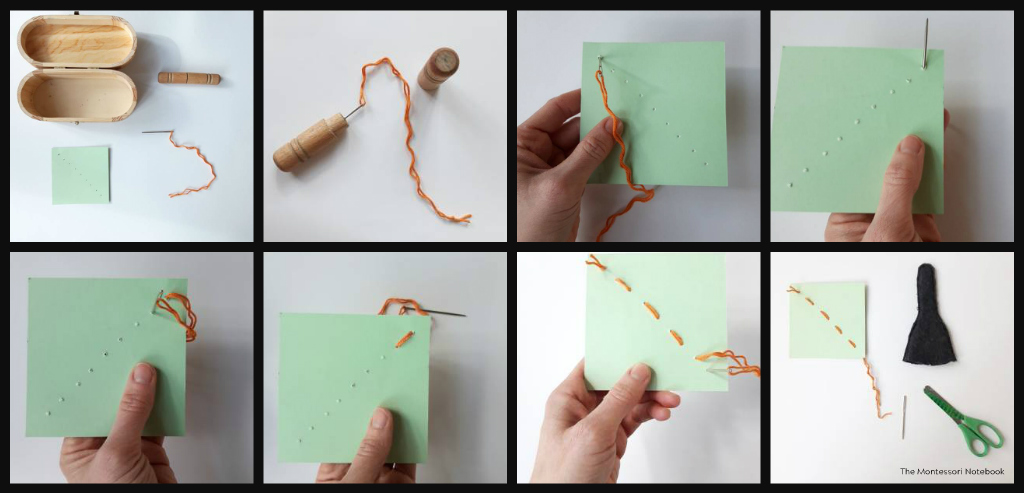
So I took some photos while the sun was momentarily shining today to break down some of the steps. This is a brief summary of the many step process but it give you the idea.
I’m always reluctant to give ages as children vary so greatly but to give you a guideline, often children show interest around 2.5 years.
Safety: the needle used is a darning needle so it has a blunt end. However, we still emphasise the child how to keep the needle pointing away from them.

Steps
- You can name the items in the sewing box – needle, sewing card, thread, needle case (for storing needle).
- I use a needle that is already threaded (double with a knot) so they can get started. As they gain skills we can teach them to thread the needle.
- The sewing card we start with at around 2.5 years old is has holes punched along the diagonal from thick card. I use a prick pen to make these.
- We start at one corner and slowly push the needle half way.
- We slowly turn the card, point to the needle, “look!”
- Then we pull the needle away from us until it’s completely through.
- We repeat for the next hole. We can show them the stitch, “look I made a stitch!”
- Continue sewing the remaining holes.
- Then we use scissors to snip the thread and tie a knot.
- We get a new thread and show them how to thread the needle and tie a knot.
- Then we offer the child to have a turn.
Let me know if your child is interested in sewing after reading this and if you give it a try. Enjoy!
If you want to move onto more advanced sewing work from a 3-6 classroom, I highly recommend the book, “Sewing in the Montessori Classroom” by Aimee Fagan.

Simone Davies has more than 20 years’ experience as an AMI Montessori educator. Simone is the author of “The Montessori Toddler” and co-author of “The Montessori Baby” and “The Montessori Child” books, comprehensive guides to raising children in a Montessori way. She currently runs parent-child Montessori classes in Amsterdam at her school Jacaranda Tree Montessori. She also has a popular blog, instagram and podcast “The Montessori Notebook” and is mother to two young adults.